When you hear "Salesforce web service integration," it's easy to get lost in the technical jargon. But at its core, it's simply about teaching your Salesforce instance to talk to other applications. This connection, usually built on standard protocols like REST or SOAP, lets you share data and automate processes, breaking down those frustrating information silos for good.
Building Your Integration Foundation
Before you even think about writing a line of Apex code, a successful integration starts with a solid plan. This isn't just about the tech; it's about understanding what connecting Salesforce to another system actually means for your business. It's about picking the right tools and design patterns to create something that not only works today but is also scalable and secure for the future.
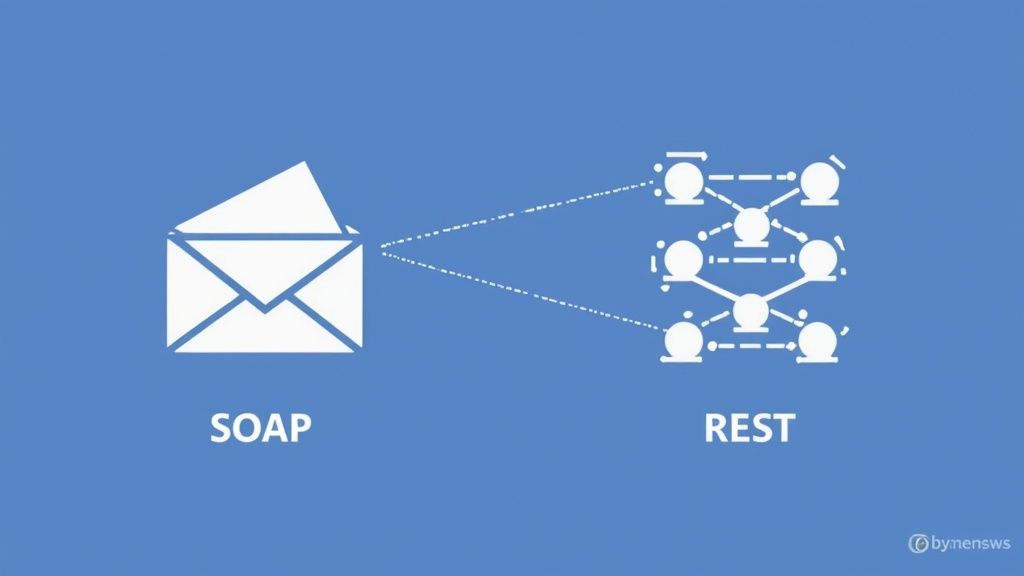
The first big choice you'll face is the API protocol. I like to think of it as choosing the right vehicle for a journey. You wouldn't take a sports car off-roading, and you wouldn't use a heavy-duty lorry for a quick run to the shops.
Choosing Your API Protocol REST vs SOAP
So, what are your options?
REST (Representational State Transfer) is the modern, lightweight choice—think of it as the sports car. It's fantastic for mobile apps and web projects where you need speed and simplicity. It works with standard HTTP methods and usually uses JSON, which is a breeze for developers to work with because it's so flexible and easy to read.
SOAP (Simple Object Access Protocol) is your heavy-duty lorry. It's more structured and rigid, using XML for its messages and relying on a formal contract called a WSDL (Web Services Description Language). It might seem a bit more complex, but its built-in standards for security and reliability make it the trusted choice for big enterprise jobs, especially in fields like finance or healthcare where the rules are ironclad.
This infographic breaks down the differences between SOAP, REST, and even the Bulk API, looking at things like complexity, performance, and how much data they're best suited for.
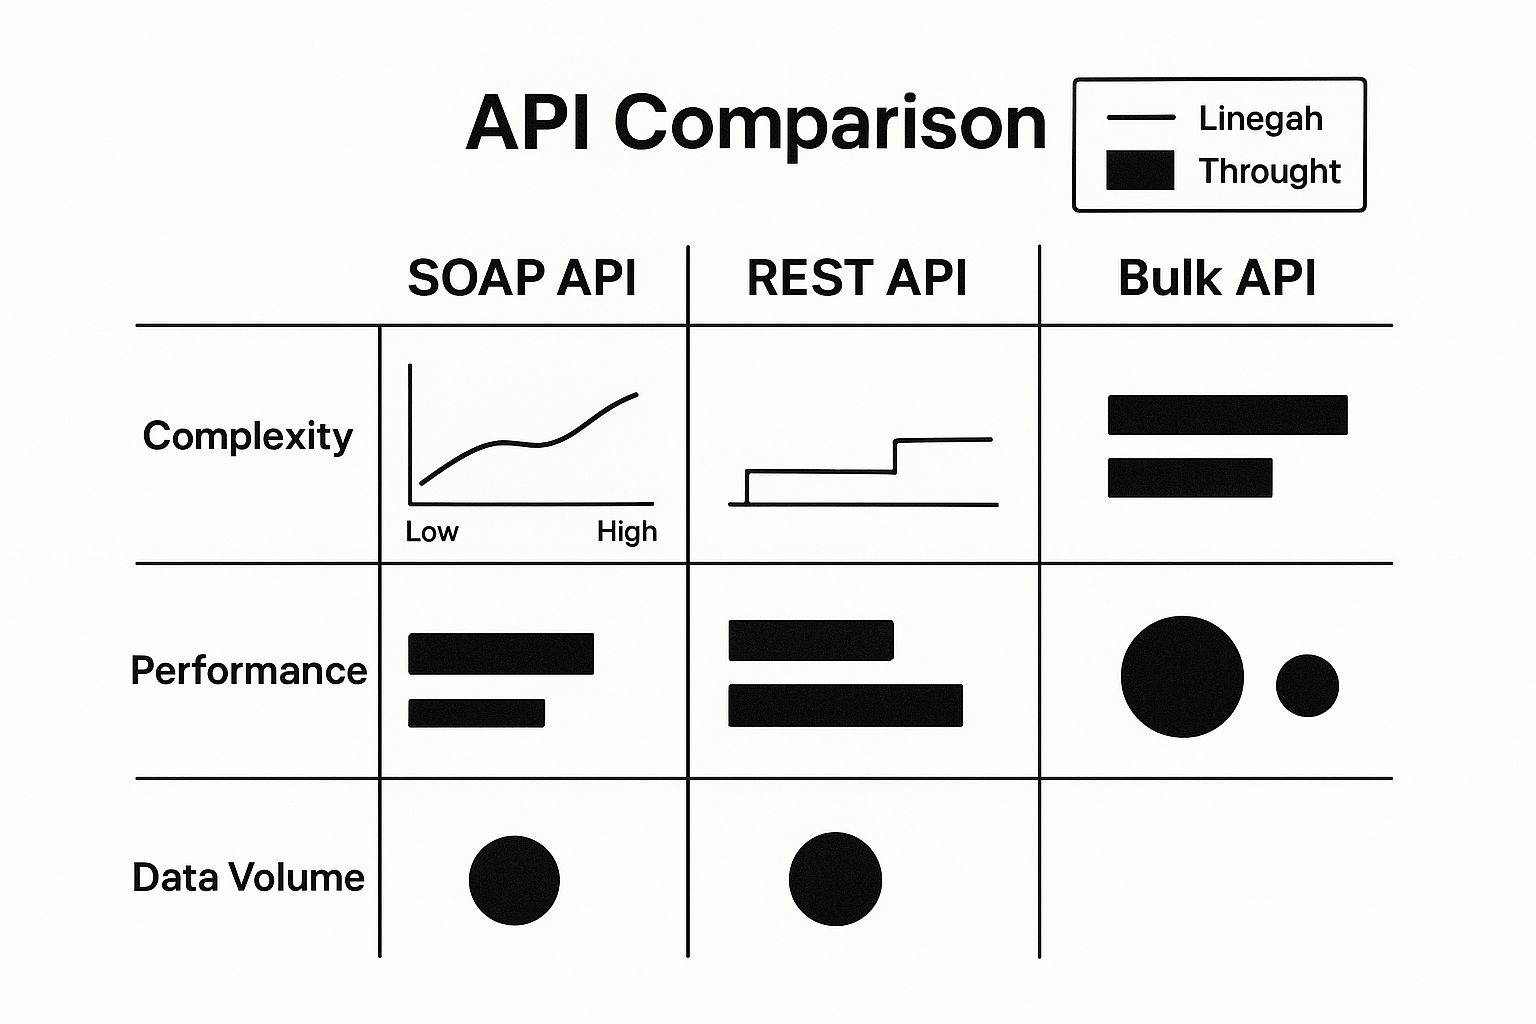
As you can see, REST is the simplest of the bunch, but when you need to move massive amounts of data, the Bulk API is in a league of its own.
To make the decision clearer, let's compare REST and SOAP side-by-side.
Choosing Your Path REST vs SOAP in Salesforce
Making the right call between REST and SOAP is a common hurdle for developers and architects. This table breaks down the key attributes to help you decide which protocol fits your project's needs.
| Attribute | REST (Representational State Transfer) | SOAP (Simple Object Access Protocol) |
|---|---|---|
| Data Format | Primarily JSON, but also supports XML, HTML, and plain text. | Exclusively XML. |
| Transport | Uses standard HTTP/HTTPS. | Can use various protocols, including HTTP, SMTP, and more. |
| Complexity | Simpler and easier to learn and implement. | More complex due to strict standards and WSDL contracts. |
| Performance | Generally faster and less resource-intensive due to its lightweight nature. | Slower and requires more bandwidth because of the verbose XML structure. |
| Security | Relies on transport-level security like HTTPS. | Has built-in, comprehensive standards like WS-Security. |
| Best For | Mobile apps, public APIs, and web services where performance is key. | Enterprise-level applications, financial services, and integrations requiring high security and reliability. |
Ultimately, REST is your go-to for speed and flexibility, while SOAP provides the robust, contract-driven structure needed for mission-critical enterprise systems.
Common Integration Patterns
Once you've picked your protocol, you need to think about how the systems will talk to each other. This is where integration patterns come in. Having worked on projects across Poland for over a decade, I've seen local trends in banking and e-commerce favour secure and scalable approaches, often driven by specific regulations and the need for hybrid IT setups. Two patterns consistently come up:
- Request and Reply: This is your classic real-time, synchronous pattern. A user does something in Salesforce—like clicking a button—which sends a request to an external system. The user's screen waits for an immediate response before they can continue. A perfect example is checking a customer's credit score from a third-party service before approving a loan inside Salesforce.
- Batch Data Synchronisation: This is an asynchronous, or "fire and forget," pattern. It's designed for moving large amounts of data on a set schedule. Think of updating thousands of product records from an ERP system into Salesforce every night while everyone is asleep.
Choosing the right pattern is absolutely critical. I've seen a misplaced real-time call freeze a user's screen, causing immense frustration. On the flip side, a poorly timed batch job can leave your team working with outdated data all morning. Always let your business process guide the pattern, not the other way around.
Preparing Your Org for External Communication
Before you write a single line of Apex, you need to lay the proper groundwork in your Salesforce org. Getting this foundation right is what separates a smooth, reliable integration from one that’s a constant source of headaches. This isn't just about ticking boxes in Setup; it's about building a secure and stable bridge to the outside world.
The first step is telling Salesforce which external systems it's allowed to talk to. This is done through Remote Site Settings. Think of it as your org's exclusive guest list. If a URL isn't on this list, Salesforce will flat-out refuse to send any callouts to it, which is its built-in, first-line security measure.
Fortifying Your Setup
With basic permissions handled, it's time to focus on security and long-term maintainability. I can't stress this enough: never use a regular employee's user account for an integration. It's a recipe for disaster. When that person inevitably changes roles or leaves the company, their user account gets deactivated, and your entire integration suddenly breaks.
Instead, always create a dedicated API-only user. This isn't just a suggestion; it's a non-negotiable best practice.
- This user should have a custom profile with the absolute minimum permissions needed to do its job.
- Assign it a specific permission set that grants access only to the specific objects and fields the integration touches. This is the principle of least privilege in action.
This approach dramatically improves security and makes debugging a breeze. When you see activity logged against that user, you know instantly which process it belongs to. This clarity is invaluable, especially when dealing with the kind of complexity common in ERP integration challenges.
Named Credentials are the modern standard for managing endpoints and authentication. They brilliantly separate your code from your configuration. Instead of hard-coding a URL and credentials into your Apex, you simply reference the Named Credential.
This is a game-changer. If an endpoint URL ever changes or an API key needs to be rotated, you just update the Named Credential in Setup. No code changes, no deployments. This simple separation makes your Salesforce web service integration far more robust, secure, and easier to manage down the road. It’s a small bit of upfront work that saves you from massive headaches later.
Bringing Your Integration to Life with Apex Callouts
Okay, you've done the groundwork and configured your Salesforce org. Now for the exciting part—making things happen. This is where we stop planning and start coding. Your integration strategy comes alive with Apex callouts, the actual code that lets Salesforce talk to the outside world, sending requests and handling the replies.
At its core, writing an Apex callout is all about building and sending an HTTP request. You'll mostly find yourself using two key methods: GET to fetch data, and POST to send data over to another system to create or update records.
Making a Simple GET Request
Let's imagine a real-world scenario. You need to pull the latest shipping status for an order from a logistics partner's API. A GET request is your go-to tool for this. In Apex, this means you'll create an HttpRequest object, tell it where to go (the endpoint) and what to do (the method), then send it on its way using the Http class.
Here’s a straightforward, no-frills example of what that looks like in action:
// The endpoint URL from the logistics provider's API String endpointURL = 'https://api.logisticsprovider.com/v1/orders/12345/status';
// First, create the HTTP request object HttpRequest req = new HttpRequest(); req.setEndpoint(endpointURL); req.setMethod('GET');
// Now, send it and wait for the response Http http = new Http(); HttpResponse res = http.send(req);
// Did it work? Check the status code. if (res.getStatusCode() == 200) { // Success! Let's see what we got back. String responseBody = res.getBody(); System.debug('Shipping Status: ' + responseBody); }
This little script fires off a request and, if it gets a successful response (a status code of 200 means "OK"), it prints the data it received. In a real integration, your next move would be to parse this JSON or XML response into an Apex object you can actually work with.
The Critical Choice: Synchronous vs. Asynchronous Callouts
The simple example above is a synchronous callout. That means your Apex code stops and waits for the external service to respond before it does anything else. This works fine for super quick, simple requests. But it comes with a massive risk: if that external system is slow or hangs, it can completely freeze the user's screen, leading to a terrible experience.
Even worse, if you make a synchronous call from something like a trigger, you can blow through your governor limits in a heartbeat. This is precisely why asynchronous callouts are so important.
Choosing between synchronous and asynchronous processing isn't just a technical detail—it's a fundamental architectural decision. I've seen integrations fail because a developer used a synchronous call for a long-running process, causing timeouts and frustrated users. Always default to asynchronous for anything that isn't required in absolute real-time.
Asynchronous callouts do their work in the background. They run on a separate thread with much more generous governor limits, so they won't block the user or the main transaction. You have two main tools for this in your toolkit:
- @future Methods: The classic way to run a process asynchronously. You just add the
@future(callout=true)annotation to your method, and you're off. - Queueable Apex: A more powerful and modern approach. It lets you chain jobs together and pass around complex data types, something future methods struggle with.
For any Salesforce web service integration that might take a while or needs to be kicked off from a trigger, Queueable Apex is almost always the right call. The demand for this kind of smooth connectivity is exploding. Globally, Salesforce processes a staggering 7.6 billion MuleSoft integration transactions every year. And since 2020, we've seen the adoption of Lightning Platform integrations in Poland jump by about 25% annually, often to connect with on-premise systems. You can dig into Salesforce's company facts and figures to get a sense of the sheer scale of these operations.
Securing Your Connections and Credentials
When you're connecting Salesforce to another system, security can't be an afterthought. It has to be baked in from day one. I've seen too many projects stumble because they treated security as a final checklist item instead of the foundation it needs to be. The biggest piece of this puzzle is figuring out how to authenticate with external services without exposing your data, or worse, your customer's data.
The most basic method you'll run into is a simple API key. It's usually just a long string of characters you pop into an HTTP header with every request. It's easy, sure, but it's also the least secure option out there. Honestly, I'd only ever use it for low-risk integrations that deal with public data.
For anything that handles sensitive information, you have to step up your game. That means turning to modern, secure authentication standards.
Adopting Secure Authentication Methods
These days, the gold standard for secure authorisation is OAuth 2.0. It's a framework that lets your application get limited, temporary access to a user's account on another service without you ever having to handle their password. I like to think of it as a digital valet key—it gives your integration permission to access specific resources for a short time, but you never get the master keys to the entire account.
Walking through an OAuth 2.0 flow for the first time can feel a bit daunting, but it’s a well-understood process. You'll redirect your user to the external service where they grant consent. The service then sends back an authorisation code, which your app swaps for an access token. That token is what you'll use to make your API calls.
The single most dangerous mistake I see in integrations is hard-coding credentials—API keys, usernames, passwords—right into Apex code. It’s a huge security hole and a maintenance nightmare waiting to happen. This is exactly why Named Credentials are your best friend.
Salesforce's Named Credentials are a brilliant solution to this problem. They let you securely store both the endpoint URL and all the authentication details in one safe place. Your Apex code then just refers to the Named Credential by name, keeping all the sensitive bits completely separate. If an API key needs updating or an endpoint URL changes, you just change it once in Setup. No code changes, no new deployment.
Managing Credentials the Right Way
Sometimes you have other secrets to manage beyond what fits into a Named Credential. For those situations, Protected Custom Metadata Types are the go-to solution. They let you create custom configuration records that are encrypted at rest and can only be accessed by Apex code within your specific namespace or managed package. This is perfect for keeping secrets from being accidentally exposed anywhere else in the Salesforce UI.
Proper credential management also means thinking about the entire lifecycle of your authentication tokens. With OAuth 2.0, access tokens are designed to be short-lived—they will expire. A well-built integration has to be ready for this.
Your code must be able to gracefully handle a 401 Unauthorized response. When that error comes back, it should kick off a process to use a refresh token (if the OAuth flow provides one) to get a new access token automatically. All of this should happen behind the scenes without the user even noticing. By building in this kind of self-healing logic, you can automate customer support and other critical processes, making sure they stay up and running 24/7.
Forging Resilient and Testable Integrations

Let’s be honest. An integration that only works when everything is perfect isn't really an integration at all; it's a ticking time bomb. The moment a network hiccups or an external API throws a curveball, a fragile connection becomes useless.
This is why building for resilience and testability isn’t just a nice-to-have. It’s the very core of a professional Salesforce web service integration. It's what separates the amateur from the expert.
Crafting Solid Error Handling
Your first line of defence is always going to be a well-thought-out try-catch block. I’ve seen countless developers stop at just catching a generic Exception, but to build something truly resilient, you have to dig deeper.
Think about catching specific exception types. A CalloutException is a completely different beast from a JsonException, and your code should react accordingly. One might trigger a retry, while the other flags the data for manual review.
This is also where a custom logging framework becomes your best friend. When an error pops up, a simple stack trace won't cut it. A good log needs to capture the entire request body, the headers you sent, the status code you got back, and the raw response body. This level of detail turns a baffling failure into a straightforward debugging puzzle.
Mastering Testability with Mocks
You can’t push Apex code to production without test coverage, and code making callouts is no exception. But here's the catch: you can't—and absolutely shouldn't—make live API calls from your test classes. That's where Salesforce’s built-in mock framework saves the day.
The HttpCalloutMock interface is your secret weapon for hitting that 100% test coverage goal. It lets you simulate HTTP responses without ever sending a real request out to the network, giving you total command over your test environment.
You can—and should—simulate every imaginable scenario:
- A perfect 200 OK response with a clean JSON body.
- A 404 Not Found error to see how your code handles missing records.
- A 503 Service Unavailable response to make sure your retry logic actually works.
- A garbled or malformed JSON response to test your parsing and error handling.
By simulating both wins and losses, you're proving your integration is truly robust. It shows you’ve thought beyond the "happy path" and considered how the system will behave under pressure when things inevitably go sideways.
Creating a mock is surprisingly straightforward. You just need to write a class that implements the HttpCalloutMock interface. Inside its respond method, you construct and return the exact HttpResponse object you want your test to see. Then, in your test method, you tell Salesforce to use your mock.
This comprehensive testing approach is a cornerstone of effective business process automation, ensuring every automated step is reliable and predictable. This isn't just about following best practices; it's a non-negotiable step for deploying code you can actually trust.
Answering Your Biggest Integration Questions
When you're about to kick off a new Salesforce integration, you're bound to have questions. I've been in the trenches on these projects for years, and I’ve seen the same challenges come up time and time again.
Whether you're an architect sketching out the big picture or a developer deep in the code, a few key decisions can make or break your project. Let's walk through some of the most common hurdles I've helped teams overcome.
MuleSoft or Custom Apex? Which One Do I Actually Need?
This is often the first fork in the road. Do you build it yourself with Apex, or do you bring in a heavy-hitter like MuleSoft? My rule of thumb is to let the complexity and scale of the job decide for you.
For straightforward, point-to-point jobs, a custom Apex integration is often your best bet. Maybe you just need to pull in some customer data from an external database. It's clean, direct, and you have total control without a lot of overhead.
But what if you're orchestrating a complex dance between multiple systems? Imagine pulling order data from your ERP, pushing it to a shipping provider for a label, and then updating the status back in Salesforce. That's where MuleSoft really shines. It's built for that kind of multi-system workflow, advanced data mapping, and handling a ton of API calls without you ever having to worry about Salesforce governor limits.
My Takeaway: Go with custom Apex for simple, one-to-one connections. When you're managing a web of interconnected systems that need serious orchestration and monitoring, it's time to invest in a platform like MuleSoft.
How Do I Stop My Callouts from Hitting Governor Limits?
Ah, the classic governor limit headache. If you've ever written an integration, you've felt this pain. The number one mistake I see is making an API callout from inside a loop. That’s a guaranteed way to bring everything to a screeching halt.
The solution is to think in terms of bulk processing and asynchronous operations.
- Go Asynchronous: Your first move should be to get that callout into an async context. An
@futuremethod works, but I almost always prefer a Queueable Apex class. It shifts the heavy lifting to a separate thread with much higher limits, so your user isn't left staring at a loading screen. - Bulkify Everything: Don't think one record, one callout. That’s incredibly inefficient. Your code should be smart enough to gather a whole batch of records and send them all in a single, bulk API call.
Adopting this mindset is non-negotiable for any process that might touch more than a handful of records. It's the only way to build an integration that's both efficient and ready to scale.
What's the Right Way to Store API Keys and Secrets?
This is a big one, and it's all about security. How do you manage sensitive credentials like API keys and passwords? The golden rule is simple: never, ever hard-code credentials in your Apex code. It's a security nightmare waiting to happen.
The correct, professional way to do this is with Named Credentials. They are a lifesaver. You store the endpoint URL and all the authentication details right in Salesforce Setup, completely separate from your code. If a key expires or needs to be changed, you just update it in one place—no code deployment needed.
For other secrets, my go-to is Protected Custom Metadata Types. They're encrypted and can only be accessed by your Apex code. Using these tools isn't just best practice; it's how you build secure, maintainable integrations.
Can I Make a Callout Straight from a Trigger?
Let's clear this one up for good. Can you make a callout directly from a trigger? The short answer is no. Triggers run synchronously, and Salesforce won't let you hold up a database transaction while you wait for some external system to respond.
The proper pattern is to decouple the two. Your trigger's only job should be to grab the necessary record IDs and pass them over to an asynchronous process, like a Queueable Apex class. That background process can then take its time making the callout without locking up the user or the original database save.
This is absolutely crucial for keeping your org fast and responsive, especially when you're integrating with systems that help with things like figuring out how to qualify leads from an outside marketing platform.
At Voicetta, we understand that seamless communication is key to business success. Our AI platform ensures you never miss a customer interaction, handling calls and chats 24/7. By integrating smoothly with your CRM and other systems, we help qualify leads, schedule appointments, and free up your team to focus on what matters most. Discover how Voicetta can transform your customer communications at https://voicetta.com.